 Picture 1
Deodorizing BMW IHKA and IHKR AC Systems
Information provided is without warranty and as is, it provides tips on what we've done as reference. Read at your own risk. Compliments of Tyrone, AK, DanT, Mug, EricS, Mola and TomM. Written by Tom McCandless CCA# 288126
Applies to E38, E39, E46, and the E53 series vehicles although this article will concentrate mainly on the E39 series with the IHKA and the E46 (M3) with either system.
It's been described as smells like a "dirty gym sock", "locker room smell", "a dead fish", "musty order", and more. Whatever it smells like, it smells. What is it? Why, it's the Climate Control System in your BMW.
The major cause of the odor is mold and mildew that take up residence in the system and live on the moisture that any AC system condenses out of the air. And the major reason that especially the cars with the IHKA system are so prone to such odors is that the driver cannot always force the system to use fresh outside air IF the AC compressor is on! In the AC mode the system alone determines whether to cool and recirculate the cabin air or to use the outside air from the micro-filters. And climate and usage have a great deal to do with which mode is selected. But even the IHKR systems can have the problem as well!
There have been many postings on the various forums about dealing with this problem. Most of them recommend spraying some form of disinfectant/deodorizer into the fresh air inlets downstream of the micro-filters. Some even recommend removing the ducts between the micro-filter boxes and the firewall to get a better shot into the evaporator housing. Unfortunately the blower obstructs direct access to the evaporator coil/housing and limits the effectiveness of this method. It does work quite well for some owners but for others, (depending on the climate and vehicle usage); it becomes an almost never-ending task.
Here is a procedure for gaining direct access to the evaporator housing and coil without tearing the whole dashboard apart. It is loosely based on BMW SI B 64 08 91 January 2002 with modifications to suit the DIY bunch.
| Deodorizing products recommended by BMW and forum posts |
1 |
ZEP Multi-surface deodorizer and disinfectant concentrate |
2 |
Professional LYSOL Brand No-rinse Sanitizer |
3 |
AirPlus A/C Cleaner Scented Kit 10531-S |
4 |
Airguard |
5 |
AirSept |
6 |
Frigi-Clean |
7 |
interdynamics AC Cleaner and Deodorizer |
The first step is to identify which system your car has. IHKx: x = A = Automatic, x = R = Regulated. Open the hood and examine the driver's side fender well just underneath the microfilter housing. There will be one or two heater control valves located there. One valve means you have an IHKR system, two an IHKA. The dual valves of the IHKA system allow the driver and passenger independent temperature settings, while the single valve IHKR does not. You MUST know which system your car has BEFORE starting the process.
Maybe you’ll need:
Maybe because some of the recommended products may come with a suitable spray mechanism. In that case, all of the garden sprayer/tip fabrication stuff won't be needed. Further, if the car is an E39 IHKA and the dealer has deodorized previously, you won't need the stuff to make a hole in the housing or the plug.
1. (IHKA) Black nylon hole plugs. Sizes �", 5/8", and �". Just buy them all. You’ll only use one but save yourself an extra trip to the hardware store. I also got these at Ace and it DID take two trips. I’ll tell you why later.
2. (Both) A regular, run of the mill, garden sprayer. The kind you pump up. The spray wand must be removable and must be made of brass or copper. Buy an extra wand because you’ll be modifying one and you still have to spray the bugs! I got mine at Ace Hardware about 15 years ago and picked up a replacement wand last weekend.
3. (Both) Twelve inches of NEW �" copper tubing.
4. (Both) X-ACTO extra fine saw blade (part number x239 or similar)
5. (Both) Soldering Gun and rosin core solder
6. (Both) Vise or a good pair of ViceGrips
7. (Both) Dremel tool (preferably variable speed) with an 1/8" rotary cutter, a < �" diameter grinding wheel, and if you’re spastic like me, a �" sanding drum (fine cut).
8. (Both) Set of jeweler’s files
Got it all? Let’s get started. First we'll do the E39 with IHKA system.
Access to the interior of the evaporator housing and coil is achieved by drilling a hole in the driver's side of the housing.
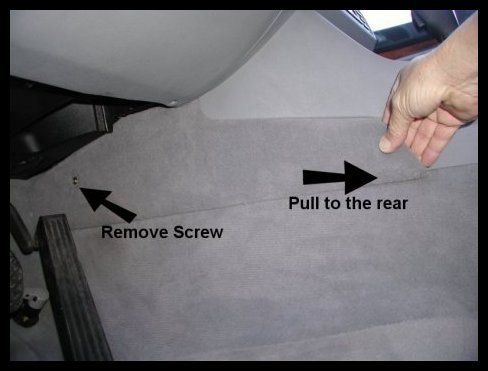
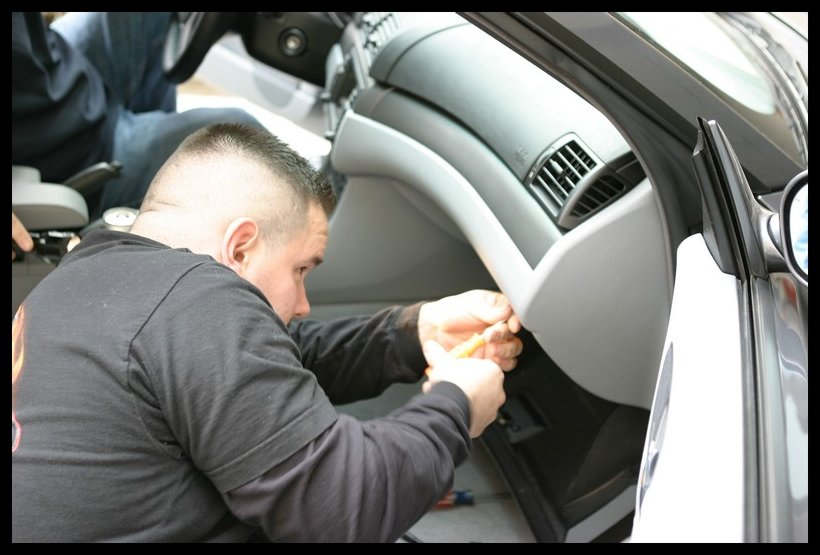
Refer to Picture 1 and remove the screw that secures the carpeted panel to the driver’s side of the console. Work your fingers under both ends and slide it straight back toward the rear of the car. It’s held on by two spring steel clips and they can be tight! This is the only part you’ll have to remove.
Picture 1
Refer to Pictures 2 & 3. Measure up from the bottom of the evaporator case between 1.25" to 1.50" and mark the case. DO NOT USE A DRILL AND REGULAR BITS TO CUT THE HOLE! THEY TEND TO GRAB IN THE PLASTIC AND THE TORQUE OF THE DRILL CAN SHATTER THE STUFF BEFORE YOU CAN RELEASE THE TRIGGER. You don't want to remove the ENTIRE dashboard to replace that case.
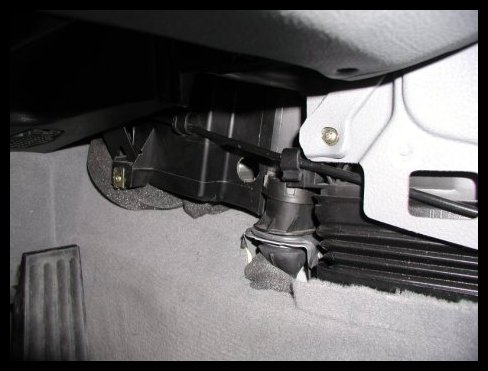 Picture 2
If you look carefully, you can see the evaporator coil inside the housing. Now that you know where it is, DON'T BANG IT WITH ANYTHING! At minimum you'll bend the fins. I don't even want to think about maximum!
Using the Dremel tool (as slow as it will go, please) and the rotary cutter cut a small hole on the mark and centered in the flat area. Very slowly and carefully enlarge the hole until the small grinding wheel will fit, then using it, enlarge the hole further until the �" hole plug fits nicely. If you goof up (like I did) you’ll have to take it out to 5/8". Or bigger. By the third try, I was becoming semi-proficient. So I’m a slow learner, so what? And I got to make an extra trip to ACE. What’s that worth?
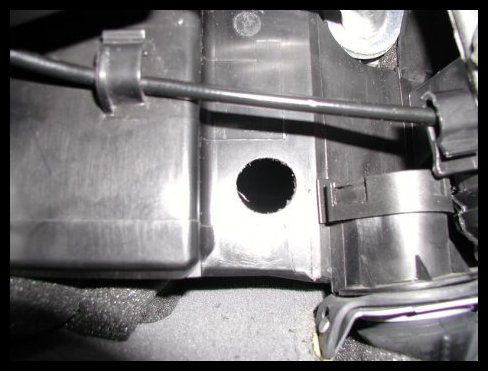 Picture
3
Picture
3
Now you need to modify one of those spray wands so it shoots sideways instead of straight ahead. The evaporator case is about 11' wide so the wand needs to be no more than 12 to 14 inches long. Much longer and the handle and your hand will hit the door jam and force you to angle the tip toward the evaporator. Cut the factory tip off with the X-ACTO saw and debur the end of the wand.
Use the vise or ViseGrips to crimp one end of the copper tubing closed. Tight as you can. Then make a cut with the saw that JUST goes through the wall of the tubing. Go down the tubing another inch or so from the partial cut you just made and cut your new tip off. Debur it inside and out. Slide it inside the cut off wand and tape it with electrical tape. A couple of tight wraps are enough. Now test the spray pattern with plain water in the sprayer. Hopefully it will be a nicely distributed and fan shaped the first try. Me, I chewed up all but about four inches of that foot of tubing getting it the way I wanted. When you're happy with it, solder it inside the wand. Also solder the crimped end to insure no leakage there.
See Picture 4 below for a shot of my marvelous hi-tech finished product. The wire tie is so you can tell that the end is getting close to coming out of the hole. You don't want to spray all over the interior of your car do you?

Picture 4
Assemble the sprayer and do a "dry run". No pun intended! Make sure you can go straight in the hole, to the rear of the evaporator coil, and touch the opposite wall of the housing. Easy does it. BE GENTLE! See Picture 5.
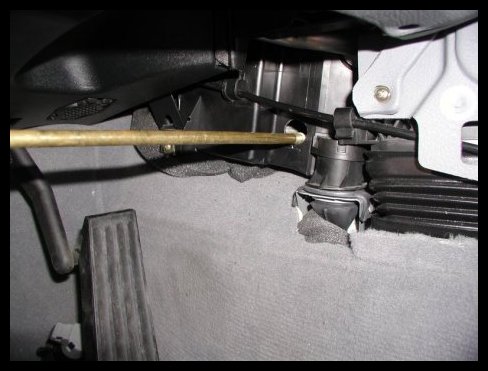
Picture 5
Now lets jump to the E46 (IHKA or IHKR) for access to the housing interior.
Access is through the final stage resistor opening in the passenger side of the evaporator housing.
Remove the glove box and rear trim panel so you can access the area behind the passenger foot well duct. See Pictures 6 and 7.
Picture 6
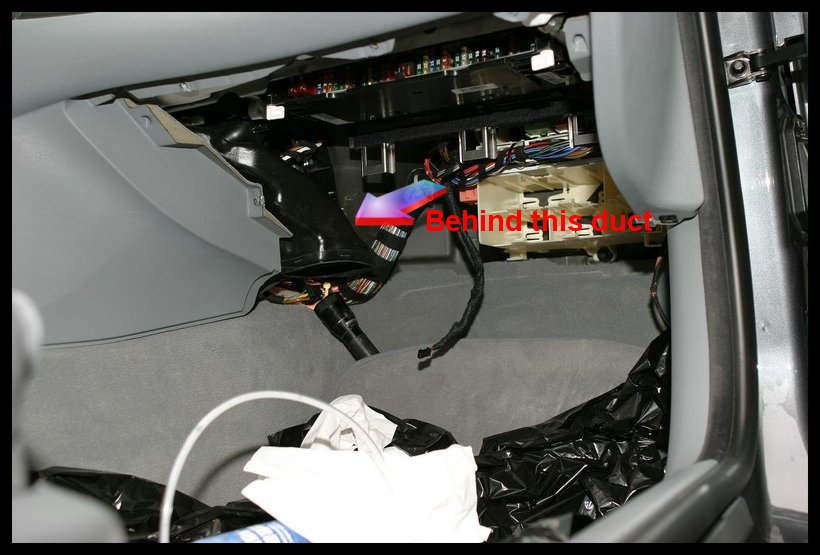
Picture 7
If necessary, remove the stepper motor to gain access to the final stage resistor. Remove the final stage resistor. There is your opening. Do your dry run to make sure you can get the spray to go where you want it. Note that the hole is much larger than that made for the E39 IHKA. Make sure you have a couple of towels handy in case of back spray.
If it all seems ok, cover the entire area with a couple of plastic trash/leaf bags, "just in case". And have a couple of towels handy. Close the center (front and rear) air outlets and open both front doors. Pop the hood and remove the micro-filters from their housings. Remove the ducts between the micro-filter housings and the firewall. If you reach in the firewall side, you should be able to feel the blower squirrel cage.
I said what? Only one part to remoe? I LIED!
If you are using a product that requires mixing, do it in accordance with the manufacturer's instructions. A half-gallon should be PLENTY! Pump it up and go for it! Go in and out and round and round. You not only want to SOAK the coil; you also want to wash down as much of the housing as you can. Glance under the car. You should see the solution dripping out of the AC condensation drains left and right just aft of the tranny. If you don't see any stuff running out, STOP SPRAYING! Your drains are plugged and you are about to flood the interior of the car! Clear drains.
Spray about 3/4 of the mix in there. All over the place. Since I ended up with fairly large hole, I stuck my finger in too. Cut down the splashing a lot. And let me feel for the wire tie "indicator'. When done with an IHKA system, install the hole plug and replace the carpet panel. Or if doing an E46 with either system, replace the final stage resistor, stepper motor, trim panel and glovebox. Remove the plastic sheet or (trash bags).
Take a 15 minute break. Have beer or something. While you're indulging yourself, install the unmodified sprayer wand on the sprayer and set the nozzle to as fine a mist as possible. After your break, start the car, and on the Climate Control Panel, select the center vent position only, turn the AC compressor on, and run the blower speed to maximum. Go under the hood to see of the firewall air inlets are still open. If an IHKA system, they may have closed so you will have to set the interior temperature settings higher to fool the system into selecting outside air.
Once you get those inlets sucking, spray the remaining solution into them in short bursts, allowing the mist to be drawn into the system. Wouldn't hurt to dribble a little in the filter boxes too. And spray the inside of the ducts while they are off. When the solution is gone, shut the Climate Control System off completely, Turn the car off and replace the micro-filter to firewall ducts. A little silicon grease eases locking them into position. Make sure the clips at the micro-filter end latch securely. Replace the micro-filters and the lids.
If at all possible, leave the car set for a couple of hours, preferably overnight. The odors should be eliminated next time you use the car. Personally, I never have been able to smell a thing. But my better half (the prime driver) has a nose like a bloodhound and she says that the smell is totally gone.