2. Turn on your old lights and mark the beam pattern on a white wall with black tape or something so that you will be able to aim the lights at the end of the swap.
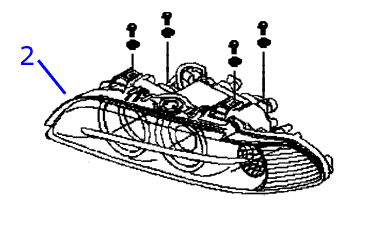
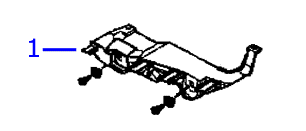
3. Take your new headlights out and remove the mounting bracket (#1) that is installed at on the bottom of the assembly (#2). Keep the mounting brackets with the new headlights.

4. With an 8mm socket head driver remove the four screws from the light assembly (#2) that are visible looking down from above the headlights installed in your car. You will need an extension or a long 8mm driver to get the ones at the bottom. Take care not to drop the screws down into the car as you will need them later.

5. Using a torx bit you will need to unscrew the holder for the xenon transformer. It is easier if you get the light assembly partly out before you attempt this as there will be more clearence. Take the transformer out and just let it sit there.
6. Unhook the wiring harnesses from the light assembly, but do not unhook the xenon transformer, simply unhook the connection at the light assembly.
7. Pull the old light assembly (#2) completely out.
8. Remove the body colored trim piece from the bottom of the light assembly (#2) and install it on the bottom of the new assembly.
9. Remove the harness (#1) that the two bottom screws were screwed into in your old light assembly. This is accomplished by unscrewing two 8mm screws that are facing the same direction as the headlights point. The harness interface to the light assembly is different from 2000 to 2001 so you will need to use the new harnesses (#1) that came with your lights (the ones you removed in step 1).

10. Install the new harness (#1) that you removed by screwing
the two 8mm screws back into the same place that the old ones were.
11. Slide the new assembly into place putting in the turn signal end in first, and making sure that you get it in all the way.
12. Insert the ballast into its holder. You may have to bend the top cover flange a bit to get it to fit.
13. Hook up all the wires and test.
14. Screw the two bottom screws in while holding the turn signal end flush with the body of the car. Do the same for the top two screws.

15. Adjust the headlight using the two adjustment screws on top of the assembly. I found that it is easiest to use a cordless drill or something for this as it takes a lot of screwing to get a little adjustment.
16. You are done.