I decided to tackle the StepTronic reverse modification based on the brief write-up in bmwtips.com that said it was possible. It mentioned switching a pair of wires under the shifter.
The first step was to purchase the updated (Model Year 2002) trim plate which showed the "+" toward the driver and the "-" away from the driver. The new trim plate is $101 from Pacific BMW or $142 from your local dealer. Part number is 51-16-7-060-697.

Model Year 2002 trim plate. Previous years have +/- reversed.
Next, I unsnapped the leather boot and the old trim plate, then disconnected the three wiring connectors to it and set it aside.
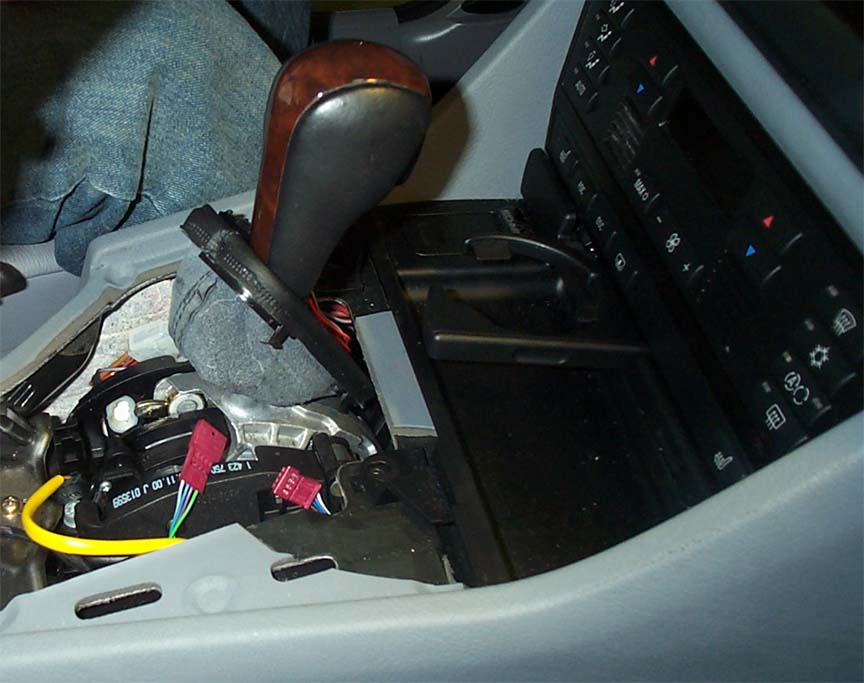
I removed two philips screws at the front which hold down the wood trim panel. After a bunch of poking and prodding, I discovered a 3rd screw directly underneath the Hazard (4-way flasher) switch which needed to be removed before I could unsnap and lift (partially) the wood trim enough to gain access to more wiring.

Lifting the wood trim plate to gain access to wiring
I had to disconnect several more wiring harnesses, including one that was fastened to a square hole in the forward left part of the wood trim plate. That one is disconnected, then the connector remaining attached to the trim panel is twisted until the hole in the trim panel and the square protrusion on the connector line up. Then it can be pulled off.
Next, I located and disconnected the purple plug to the right of the shifter that had 4 wires (white, blue, purple, green). The male end had enough slack that I could work with the connector to reverse the center two wires. The female end with white/green, blue/gray, blue/green, brown/black wires, as described in BMWtips.com, did not have enough slack to work with.
Reverse center wires in purple connector shown in foreground
In order to reverse the center wires (blue & purple), I carefully removed a black retaining flap from the connector by prying it loose with a jeweler's screwdriver and sliding it off sideways. Then, while Young Kim held the connector, I gently pressed the triangular ridge on each of the two middle pins and pulled them free with needle nosed pliers. I reversed them and slid them back into the connector until they clicked into place. Then I reinstalled the black retaining flap and plugged the two halves of the harness back together.
Next, I reconnected most of the harnesses and then tried to install the new StepTronic plate. Here, we ran into a slight snag. One of the three harness plugs (the one on the right)would not snap into the StepTronic plate. When I compared old and new plates, I discovered that the new plate uses a different color connector. The new one is white, the old is black. The harness easily plugged into the old StepTronic plate but not the new one. The difference is that the connector on the older cars (pre-2002) has a raised ridge on one side. The color and the ridge are used to make sure the "wrong" plate isn't installed. I snipped off this ridge with cutters and then filed it smooth. After that, the connector plugged right in with no problem.
Young went out for a test drive and came back reporting everything worked fine. It is a little disorienting at first, but he said he would quickly get used to the pattern going in the "right" direction.
So, this is a fairly easy modification for anyone who wants to switch from one pattern to the other.
Dave Z.