5
Series Door Edge Protection Molding Replacement
by Tom McCandless, 288126 Sierra Vista
Replacement based on 1999 - 528i however good for all other E39's from 1997~2003
Many of the late model Fives have a bit of a problem with wearing out the Door
Edge Protection Molding. Why they call it Door Edge I don't understand because
it isn't on the door. It's the innermost seal that runs around the door opening
in the body. Be that as it may, it seems to wear out in the area of the door
latch. If you sit in the seat, look down at the area of the latch, and slowly
close the door, you will find that the vinyl inner door panel touches this seal
first and compresses it more that at other areas around the opening. Given the
roughness of the vinyl due to the simulated graining, the fact that this area
is raised higher than other areas, and the fact that the door moves slightly
as the body flexes, it's no wonder that it wears out there. BMW says the cause
of failure is posteriors but I prefer my theory.
The seal for the front doors is the same for both right and left sides.
The current part number is 51 72 7 116 403 and it costs in the neighborhood
of $30 - $50 depending on where you get it and what kind of discount
you can finagle.
UNDER NO CIRCUMSTANCES REDUCE (CUT) THE LENGTH OF THE SEAL! It is the correct
length right out of the box.
1. Raise the seat as high and as far to the rear as it will go to give yourself
room to maneuver.
2. The plastic doorsill that runs along the bottom of the door opening is held
on by three nylon retainers that snap into holes in the bottom door jam. To
remove it, work your fingers under the front edge next to the floor carpet.
Get under just as far as you can and start working it straight up. As soon as
you can get it high enough, get both hands into play. Using CONTROLLED energy,
pop the sill upward with a jerking motion. The sill is made of pretty tough
stuff so you should be OK. Mine popped right off.
3. Removing the doorsill exposes the joint in the seal. Work one end or the
other up off the body seam a little bit.
4. Mark the seal seam location on the body with a pencil or a fine tip felt
marker so you can put the new one back in the same location
5. Grab the free end and peel the seal off the body.
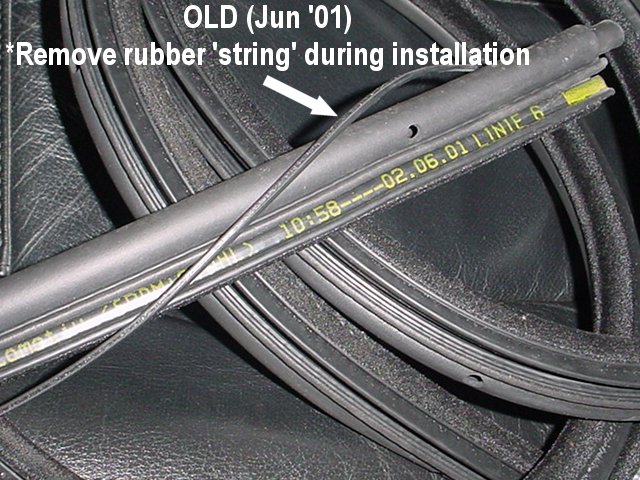
6. This is IMPORTANT! Compare the old and new seals. My new one had the "fuzzy"
part of the seal attached to the "slick" part with a tiny strip of
rubber. This strip MUST be removed from the seal. Grasp one end or the other
firmly and peel it out/off of the entire new seal. This frees the innermost
edge of the "fuzzy" part to lay out into the interior and cover any
gaps between the seal and the interior pieces.
7. It really doesn't matter which direction you go to start working the new
seal on. I started at the mark made in step 4 and worked forward.
8. Try not to stretch the seal lengthwise as you work it on around the opening.
If you do you will come up with an overlap situation. DON'T CUT IT OFF! Just
peel it off and try again. I actually had better luck pushing back toward the
already installed section. It took three times before I got it right. First
time I stretched it too much, second time I compressed it too much.
9. Replace the doorsill by lining the retainers up into the holes and pop it
back on. It will slide forward and backward slightly on the retainers to line
things up pretty.
10. It probably wouldn't hurt to give the seal a shot of silicone once in a
while to slow down the abrasion. At least in the area where the door panel touches
it.
Updates by Jay R. June 2003
The new 'Edge Protective Seal' has it's meeting joint at a different
location than the old design. If your E39 used the old seal you will
need to move the joint location 340mm toward the rear of the car. BMW
instructions were included with my new 7-116-403 seal.
The new 'Edge Protective
Seal' has a different design in comparison to
the '01 seal I removed from my E39. Notice in the photo the smooth area
on the outermost section of the rubber seal. The rubber seal is also
narrower in cross-section.
The second photo
shows my old '01 seal and the rubber 'string' that I
removed from my new seal.