Front Seat Fixes
by Richard
Cousins 2003-04-21 (1998 - 540i) with acknowledgements to Jim Cash and
others.
The posting at bmwtips.com by "Lefty" provides a very good guide to the steps
for really getting stuck into the front seat frame.
The only additions to that are:
- if you are removing the driver's seat, make sure the steering wheel is
fully forward before you start
- after fully lowering the headrest, place the seat back at around 60
degrees for best manoeuvring throuigh the (front) door
- place a towel or some other protective material over the door sill and
front of the B pillar
- do NOT turn the ignition on after disconnecting power from the seat
as this will trip the SRS warning light which has to be reset by a dealer
- in fact it is a very good idea to disconnect the battery before
disconnecting power from the seat
- when reconnecting the seat wiring, double checking that the sliding
connector has fully clicked into place, before reconnecting the battery.
I needed to replace a (broken) foam pad on the seat bottom and for this I
found a very helpful posting by "Salts" on the E38 message board and which I
have reproduced
here.
Fixes without removing the front seat
There is quite a bit of reference
to use of "jaws" to fix front seat noises and there is a good chance that many
noises can be fixed without removing the front seats. What you
will need are:
- "sliding jaws" - part number 54 12 8 105 582 - two for each seat
- T-40 and T-45 torx bits or Allen keys (make sure they are forged, rather
than cast, and not the 'tamperproof' style which are too weak
- some self-adhesive velcro strips
- a hot melt gun with glue
- light foam (say 1/4 inch thick)
- cable ties
- gel type grease (or vaseline)
NOTE: Be sure your hands are clean
the whole time. Clean them at each step and keep a rag and leather cleaner
around because you WILL get your fingers dirty.
Rear Panels
To remove the upper panel on the two part comfort seats you
push the panel straight down while pulling outward at the bottom.
To remove the bottom panel you need to push it sideways at the bottom. Push
toward the centre console and pull out at that side at the same time. Then push
toward the door and pull out at that side.
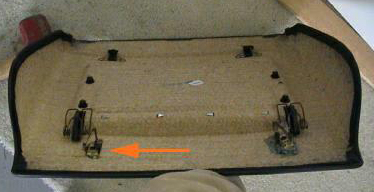
Once removed you will find two clips on each of the lower and upper panels
(arrowed above) that will respond well to a small amount of 'hot melt' to stop
them rattling.
Plastic Covers above Seat Rails
With the seat raised as high as high as
possible, remove the side covers by first undoing the small allen key socket on
both sides at the front. Then slide the plastic back first, then once the back
end pivots loose from the slot, slide the cover forward and it should remove off
of the seat frame altogether. A point of plastic noise is where this cover goes
around the seat belt bolt at the back and a little velcro fitted inside the rear
of this cover can fix that.
Two rear covers snap off, no tools required. Snap the interior side off
first. Exterior side doesn't have snap fittings. They slide out in direction
parallel to the frame rails.
Seat Rails
A common source of 'clicking' is from the bushings (there are
4 of them) where the seat fastens to the lower rails. You will see the arms
coming down from the seat to the seat rails. At the pivit points there is a Torx
bolt through each of them holding them in place. That bushing gets dry and makes
a click as it moves.
Remove each bolt and lightly grease underneath it. Replace and tighten these
and all other bolts.
Note - do not remove both front bushings at the same time as it is very
difficult to get re-aligned should you happen to move the motors in the mean
time.
Underneath
With the various motors and cables under the seat, the
judicious use of velcro (around the frames onto which some of the plastic bits
clip), foam (inside the plastic surrounds) and hot melt will eliminate a lot of
potential clicks and squeaks.
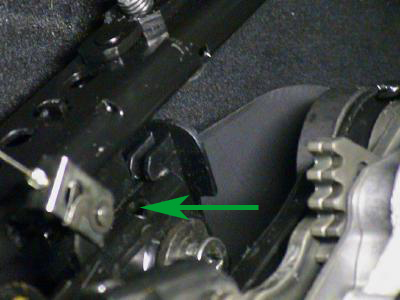
One particular item for attention is the pivot pin (arrowed above) for the
seat belt cable tensioner. Accessed from the rear floor, a slight amount of hot
melt (but don't let it drop onto the carpet) can stop an annoying rattle.
Seat Back
Removal of the seat back is quite straightforward and lubing
the bushings, and installing the sliding jaws can make a big difference.
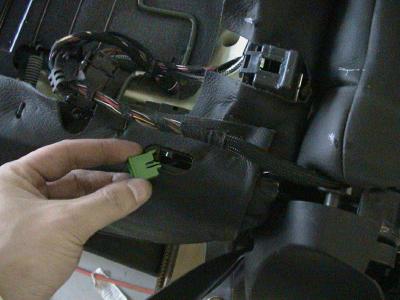
To separate the seat back/top look for the two green latch locks (above) and
pull them out. Then press the latches down and pull the seat top up. You might
need to cut the cable ties that hold the power and air to give you enough slack.
To press the latches down two screw drivers works great. With the latches
released you can pull the seat back up - but do not stretch the cables.
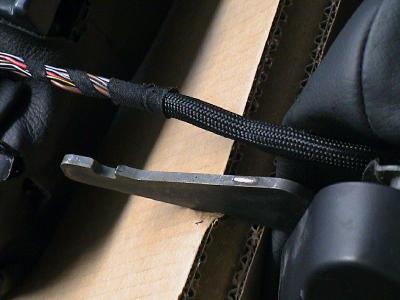
The jaws fit within the seat back at the point where the arms (above) fit in.
If you look carefully you will find two thin metal guides through which the arm
goes. The jaws goes on the outer of these two guides for each arm.
Before replacing the arm in the seat, lube the whole arm with some grease,
especially at the wear points as obvious in the above picture.
Also make sure that when you fasten all the wiring in place and that you
leave enough slack at each tie wrap so that the wire can move without chaffing.