VDO MS 5000 Installation
by Andrew Papanikolas
DISCLAIMER
This installation was performed on a 1997 540i/6 with
DSP audio and no cell phone. These instructions may not apply to other
configurations. The installation does require the disassembly of several parts
of the interior and truck of the car. If you are not comfortable tearing out the
interior I suggest you find a competent local installer. I will not be held
responsible for any damage to your vehicle that results from the use of these
instructions.
In other words... If you break it... IT'S NOT MY FAULT!!!
INTRO
These instructions apply to the installation of the VDO MS
5000 navigation system in a BMW E39 5 series. After several hours of work I was
able to get the system installed and integrated with the factory audi wiring.
All of the navigation instructions are played through the stereo speakers as
they would be with the factory system.
In case you are interested I purchased the system from The GPS Store.
I'll start at the front of the car and work my way back.
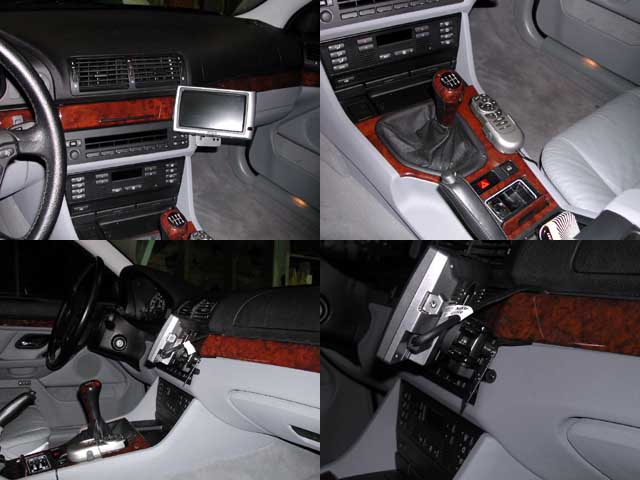
DISPLAY and REMOTE INSTALLATION
Mounting
The display was mounted to the dash using a Pro-Fit cellular telephone mount. The
mount makes use of one of the factory dash screws and places the screen in an
optimal location. To mount the bracket follow the instructions included with
the kit. From there you can mount the VDO quick release bracket to the
Pro-Fit.
The remote was mounted to the center console with the double sided tape
provided. If left in the cradle the remote communicates via hard-wire rather
than IR, so the remote doesn't need to be pointed at the screen. In addition
if left in the cradle the remote doesn't require batteries and the buttons are
illuminated.
Wiring
The wiring for the display required the removal of the
glove compartment (remove two nuts at underside rear of compartment, remove
tether and shock), the compartment trim (three screws, if I remember
correctly), and the kick panel. Run the cable under the dash and through the
crack between the upper and lower dash (you'll need to loosen the screws under
the wood trim). In order to get the pieces to fit together again I had to
force the upper and lower dash apart about 1/8" and then tighten the screws to
hold the gap open. At that point I could get the wood trim back on without
having to drill a hole for the wiring. I may purchase a new piece of trim and
drill a hole for the wire, as well as mount the display directly to the trim.
The wiring for the remote was easy. Remove the carpeted trim from the side
of the center console and tuck the cable up under the console and dash. Join
this cable up with the display cable and run them together to the back of the
car.
Cable Routing
The display and control cables must be run to the
driver's side rear of the trunk. I chose the route of the passenger side door
sills, under the back seat, and through the trunk wall with the audio and
lighting harness. To do this you'll need to remove the door sill trim for both
doors, the lower B pillar trim, the back seat bottom, and:
a) The back seat back (if no fold downs) -or-
b) Fold down the seat, and loosen the non-folding part
of the seat back on the driver's side.
I have the fold down seats so the wire routing was fairly easy. If you have
a solid back seat then you'll have to figure out how to get the wire into the
trunk. Keep in mind that there isn't a lot of extra length in the display
cable so make the run as simple as possible. Once you have the trim removed
the cable path should be pretty obvious.
NAVIGATION COMPUTER WIRING
Preparation
Remove the CD Changer, the amplifier, the
right side trim panel, the CD changer cover, the subwoofer cover, and the
subs. The exercise is left to the reader...
Locate the wiring harness for the cell phone (white rectangular connector
in line with the DB25 connector). The wiring color changes depending on the
side of the white connector, so I'll provide all of the info below. "DB 25
side" refers to the wires from the DB 25 to the white connector, "Car Side"
refers to the wires from the white connector into the car harness. You will
also need to locate the wiring to the tail lights.
If you want to get creative you can purchase a male DB25 connector and
attach to the cell interface. I didn't have one, nor did I have an easy way to
get one, so I spliced in using bullet connectors. I'll most likely clean that
up in the near future and do it with a DB25.
Wiring Color Chart
| Function |
VDO Color |
Car Side Color |
DB 25 Side Color |
DB 25 PIN |
| Switched +12V |
Violet |
Violet w/ White Stripe |
Violet |
5 |
| Constant +12V |
Red |
Red w/ Yellow Stripe |
Red (2 wires) |
4, 17 |
| Ground |
Brown |
Brown w/ Black Stripe |
Brown |
16 |
| Vehicle Speed Signal |
Black w/ White Stripe |
Black w/ White Stripe |
Brown w/ White Stripe |
|
| Audio Mute Signal |
White w/ Brown Stripe |
White w/ Brown Stripe |
Black |
10 |
| Cell Phone "Present" |
N/C (con to SW +12V) |
White w/ Green Stripe |
White |
|
| Audio + |
Blue w/ Yellow Stripe |
Brown w/ White Swirl |
Yellow w/ Black Rings |
25 |
| Audio - |
Blue w/ Green Stripe |
Black w/ White Swirl |
Green |
19 |
| Parking Lights |
Gray |
Gray w/ Green Stripe |
N/A |
N/A |
| Reverse |
White w/ Yellow Stripe |
White w/ Yellow Stripe |
N/A |
N/A |
Power
You'll need switched and unswitched +12V as well as
ground.
Speed, Reverse, and Lights
The navigation computer needs to know
when the car is in reverse, when the headlights are on, and a vehicle speed
signal. I wired into the backup lights (White/Yellow wire at tail
lights), and the parking lights (Gray/Green wire at tail lights). The lighting
signal is not to dim the display, but to tell the system to switch to the
night time color scheme. Follow the instructions and do NOT connect this lead
to the dash dimmer. The speed signal is provided to the DSP and the cell
phone. You can tap into it at the white connector (See Table).
GPS Antenna
I mounted the GPS antenna under the rear deck behind
the brake light. Rather than remove the deck I reached through the woofer
holes and secured the antenna with the included double sided tape. I then ran
the wire through the metal deck and into the trunk. It's important that the
antenna not be blocked by metal, so the rear deck is an ideal location. I
don't have metallic tint, but that may pose a problem if I ever switch.
Audio
This was a pain to figure out. Apparently with DSP the
cell phone audio is played though all of the stereo speakers, not just the
driver's door. I couldn't find the wiring that went directly to the second
voice coil. After some investigation I found that there is a "cell phone
present" signal that is fed to the DSP when the phone is installed. To mimic
this signal I applied switched +12V to the White/Green:White wire on the white
connector. Then I connected the + and - audio output of the VDO to the white
connector. The final step is to connect the muting signal to the
wire on
the white connector.
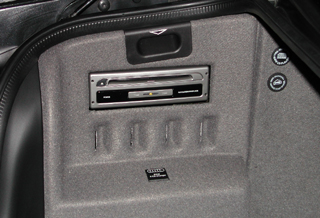
COMPUTER MOUNTING
Originally I mounted the computer to the underside of the rear
deck between the woofer box and the trunk light. This worked, but cutoff too
much light from the trunk light (plus it didn't look that good). I took a trip
to the parts department and ordered the following 3 parts to mount the
computer in the factory location (the factory computer is DIN sized as well).
| 65 50 8 361 458 |
Bracket (from CD bracket to NAV bracket) |
$5.48 |
| 65 90 6 909 251 |
NAV Bracket |
$21.80 |
| 51 47 8 190 763 |
Trunk Trim |
$187.92 |
I wasn't sure if this was going to work, but it was worth a try. (Keep in
mind that these are for a 1997 540 w/ DSP)
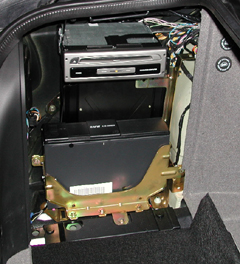
Figuring out how the brackets fit was a bit of a problem. Explaining it is
even harder, but here goes...
The NAV bracket mounts to one of the M4 bolts protruding from the underside
of the CD Changer cover latch. The bottom left of the bracket attaches to the
top left of the DSP bracket. The ??? bracket attaches to the right side of the
CD changer bracket and the lower right of the NAV bracket. The nav computer
just slides in and locks in place. The new trim piece replaced the factory
piece with no trouble.
PROBLEMS
I have only had a couple of problems with the
system/installation:
- The weight of the display is a little much for the Pro-Fit bracket. This
caused the display to wobble up and down on bumpy roads. I wedged a little
rubber bumper in the gap (see pic) and that seemed to help, but for how
long???
- I need to cut the bottom off of the Pro-Fit (or mount a cell phone
there).
- When the check/control probes the parking lights during the day the
display will briefly switch to night mode. This rarely ever happens.
Other than that the system has been bullet proof and I'm very
satisfied with the results.